Migrating from Lightroom Classic to Photos
In the summer of 2023, I decided I was no longer serious enough about photography to continue paying for an Adobe subscription. (I still enjoy taking and editing pictures, but some of my other hobbies are just more fulfilling at this point, and the time I spent as a “serious” hobby photographer got shorter and shorter.) It was hard to justify paying $120 a year for software that I wasn’t using that often. Non-subscription photography software has come a long way since I started using Lightroom and Photoshop almost 10 years ago, and some of the alternatives seemed more than capable of meeting the needs of a casual user like me. Lightroom had become very sluggish on my 2019 iMac, which is otherwise working fine. It was also inconvenient being half in the Apple ecosystem and half in the Adobe ecosystem. The photos I took with my iPhone were available everywhere, but the photos I took with my Fuji mirrorless were only on my Mac. I began thinking about how I could move from Lightroom to Apple Photos — or if it was even feasible.
The advantages of such a move were obvious to me: long-term financial savings and having all of my photos easily accessible on my iMac, iPad and iPhone.
There were two big cons to consider before abandoning Lightroom. First, loss of fidelity. The edits you make in Lightroom aren’t part of the photo files; they’re just stored in Lightroom’s database, so you can’t just drag and drop the files from Finder into Photos. You have to export the photos first so that any edits (including changes to metadata like GPS coordinates) get flattened down to a single file. That means the files you bring into Photos aren’t the same files you have in Lightroom, and you won’t be able to undo any edits after the photos leave Lightroom.
Second, loss of photo management features. There are many lower-cost, non-subscription Photoshop alternatives that meet the hobbyist’s photo editing needs. But there’s nothing I’ve found in the Apple Photos ecosystem that offers Lightroom’s photo management power. There’s Photos itself, of course, but it’s too simple. The best photo management software I’ve found (that can work with a Photos library) is RAW Power. Its photo management capabilities, especially filtering, aren’t exactly on par with Lightroom’s, but it’s the closest thing I’ve found.
I decided I was OK with the cons, and it would make the most sense financially and functionally to move my photo library from Lightroom to Photos. When I started, I thought certainly someone had done this before and documented it online. I did find a few posts on Reddit and some photography forums, but they were mostly about solving specific problems during the migration. I didn’t find any comprehensive write-ups on how they actually did it, so I decided to write about how I did it in case it helps someone else out there.
Caveats
Before I get into the details, I want to mention a few caveats.
- Allow yourself several months before your Adobe subscription renews to complete the migration. Cancelling an annual subscription that’s paid monthly can be expensive if you time it incorrectly, and this isn’t a fast process.
- I’m not an expert in photography or in any of the software I mention in this post. Even if you follow the steps exactly as I describe them, your mileage may vary.
- I did a lot of these steps the hard way. I was piecing together this process as I went along, incorporating advice I found on various websites. (Some of that advice was less helpful than I had hoped.) Sometimes I was deep into a step when I realized there was an easier way. But at that point, it would’ve taken more time and effort to back up and start over than to just finish doing it the hard way. There were also things I did the hard way intentionally because it gave me more comfort that it had been done correctly.
- Some of the steps are manual and tedious. Spending hours dragging and dropping files isn’t fun.
- Some of the steps are rather technical. I wrote a few Python scripts to make this process more efficient and reliable. These scripts are optional, but they make some of the cleanup and validation easier. You can do some of it manually instead, and some of it you can skip altogether. Only one of the scripts actually manipulates your photo library, and it doesn’t delete anything, so they’re safe to use. But you have to install Python and a separate Python module, and the scripts have to be run in Terminal, so make sure you’re comfortable doing that.
Assumptions
If you’ve been using Lightroom for a while and are familiar with most of its features, you shouldn’t have any problem following along with most of the steps. If you want to use my Python scripts, which are completely optional, you should be familiar with using Terminal on your Mac.
Table of Contents
0. Download the scripts (optional)
1. Know where you’re going
2. Make a backup plan
3. Set Lightroom to back up the catalog on exit
4. Back up your Lightroom catalog and files
5. Prune your Lightroom library
6. Clean up Lightroom folders
7. Export photos from Lightroom
8. Clean up exported files
9. Create the Photos library, folders and albums
10. Import photos and videos
11. Verify the import
12. Set the System Photo Library and enable iCloud Photos
13. Archive the exported photos
14. Archive your Lightroom catalog and cancel your Adobe subscription
0. Download the scripts (optional)
Install Python and PhotoScript
If you want to use my scripts, you’ll need to have Python and PhotoScript installed. PhotoScript’s releases page should show the latest version of Python that’s compatible with PhotoScript. Download the installer for a supported Python version here: https://www.python.org/downloads/macos/. After you’ve installed Python, follow PhotoScript’s installation instructions.
Download the scripts
Download the latest release of the scripts from GitHub and unzip the file in a directory of your choice.
1. Know where you’re going
Before you do anything, I recommend thinking about your photo editing workflow. Research software and try out trial versions to see if it will meet your needs. Import a few photos into the Photos app and get a feel for how your workflow will need to change.
For a Lightroom-like experience, I’ve been happy with RAW Power. The two things I miss most are filtering and Smart Collections. RAW Power has filtering capabilities, but they’re not as extensive as Lightroom’s. There’s nothing comparable to Smart Collections. You can make Smart Albums in the Photos app, but they don’t show up in RAW Power. You also can’t edit in an external app directly from RAW Power. That’s only possible in the Photos app. That’s not really an issue for me, though.
For layer-based editing, I settled on Affinity Photo. Some things are quite different from Photoshop, but most of the editing features are similar enough that it’s an achievable learning curve. The documentation is good, and there are a lot of video tutorials as well.
I really like having all of my photos available on my iMac, iPhone and iPad. That was part of my motivation. But I also discovered that Photos does a really good job of facial recognition of people (and pets!), so it’s easy to find pictures of specific people. (It’s not perfect, but it does a respectable job.)
2. Make a backup plan
You’ll want to make a lot of backups during this process. My normal backup strategy is to use Backblaze for offsite backups and Time Machine for local backups. I also use SuperDuper! to make a twice-weekly clone of the external drive where my photos are stored.
However, this process resulted in at least two copies of each photo existing at any given time, and my Time Machine drive became overwhelmed early in the process. I had to temporarily tighten up the Time Machine backup set and use SuperDuper! to make daily clones of my external drive.
The upshot is your normal backup routine may need to be adjusted if you don’t have enough backup storage to handle the temporary increase in the number of files on your drive. I recommend assessing your particular backup situation and making a plan before you do anything else. You may need to adjust along the way, but you don’t want to get halfway into the process and then have to completely redo your normal backup strategy.
3. Set Lightroom to back up the catalog on exit
Since you’ll be modifying your Lightroom catalog frequently during this process, I recommend that you set Lightroom to back up the catalog every time you quit Lightroom.
-
Open Lightroom.
-
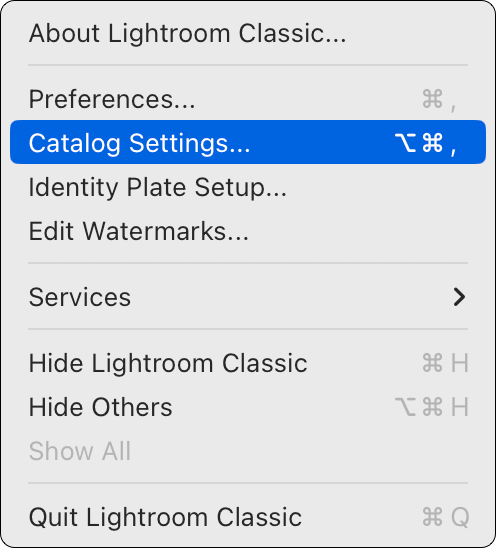
Click the Lightroom Classic menu, then Catalog Settings.
-
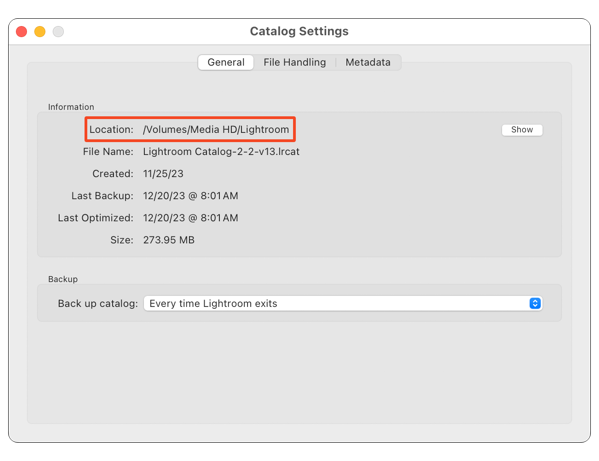
In the Back up catalog drop-down, select “Every time Lightroom exits.” Note the Location of your catalog file. Close the Catalog Settings window.
4. Back up your Lightroom catalog and files
This step preserves the last good state of your Lightroom library before you started the migration. If something catastrophic happens, you can reset to this point and not lose years of files and work.
Back up your Lightroom catalog: After you set Lightroom to back up the catalog on every exit, just quit Lightroom to make a backup. Go to the location of your catalog (see part 3), and you’ll see a Backups folder. The Backups folder contains folders named by date and time like 2023-12-09 2248. Copy the most recent backup folder to a safe location.
See this article from Adobe for more information about backing up your catalog.
Back up the files: The easiest way to do this is to right-click on the top-level directory that contains your photos and selected “Compress directory name.” This will create a zip file. Copy that file to a safe location.
<img style=“display:block; margin-left:auto; margin-right:auto;” src=“https://geofftaylor.me/uploads/2024/e041f927b5.png" alt=“Finder menu showing “Compress” command” title=“compress-folder.png” border=“0” width=“778” height=“1132” />
5. Prune your Lightroom library
When I decided to migrate to Photos, I had about 37,000 photos and videos in my Lightroom library. I knew there were a lot duplicates and garbage photos that I had just never gotten around to deleting. Unless you’ve been meticulously managing your library, you’re probably in the same boat.
To make the migration more manageable, it’s a good idea to prune your library of those unneeded files. How you approach this is going to depend on how much you think you need to prune, your willingness to invest in more software, and your patience. I’ll describe my approach, and you can adapt it as necessary to your situation.
Pruning is one of the most time-consuming aspects of the migration. I would recommend that you start by eyeballing your library in Lightroom and identifying a few places where you think you’ll get a lot of benefit for your time. Start with those folders and then adjust the plan as you go.
This is how I approached the pruning task.
-
I used Beyond Compare to compare directories that I suspected of containing a lot of duplicates. I had a good idea from eyeballing my library of where there were a lot of duplicates. (By duplicate, I mean two copies of the same file in two different directories. Basically, I was looking for identical file names, identical file sizes, and identical created and modified dates.) There are a lot of tools that will let you compare two folders. I like Beyond Compare because it’s easy to use, does a good job, and is relatively inexpensive compared to the alternatives (and I already owned it). If you want to know more about the free and paid options for comparing two directories, this article is a good starting point. All of that being said, however, I would skip this step if I had to do it over again. See step 3 below for more on that.
-
Open Lightroom and remove the duplicates. Where two directories were identical, this was as easy as picking which folder to keep and deleting the other one. Most of the time, however, I found directories that were nearly identical. It was more of a surgical process of consolidating folders and deleting individual files. Before deleting, turn on the Edits filter to see if you’re about to delete anything that’s been edited.

-
Use PhotoSweeper to identify duplicate files in the Lightroom catalog. I started with Beyond Compare mainly because I already owned it, and it’s fast. But it’s targeted; you have to pick two folders to compare. I discovered PhotoSweeper later in the process. It can analyze a Lightroom catalog and mark photos as rejected, but it takes longer. However, I would’ve just started with PhotoSweeper had I known about it earlier. See below for more information about how I used PhotoSweeper.
-
Open Lightroom and delete the rejected photos.
-
Use PhotoSweeper to identify series of shots. (See below.)
-
Open Lightroom and delete the rejected photos.
-
Use PhotoSweeper to identify similar photos. (See below.)
-
Open Lightroom and delete the rejected photos.
-
Repeat steps 7 and 8 at least once more. Finding duplicate and similar photos isn’t an exact science. After running a “similar photos” check, I could still see a lot of similar looking photos, so I ran it again.
-
Finally, manually review all vacation folders with more than 200 files. This was a judgment call because I tend to take a lot of photos on vacation, and I correctly suspected that I had a lot of photos of the same subject that weren’t similar enough to be flagged by PhotoSweeper.
PhotoSweeper
I used PhotoSweeper for two tasks. First, to identify true duplicate files that I didn’t find with Beyond Compare. Second, to find photos that weren’t duplicate files but were nearly identical.
When you start PhotoSweeper, it will ask which mode you want to use. I always used Single List Mode.
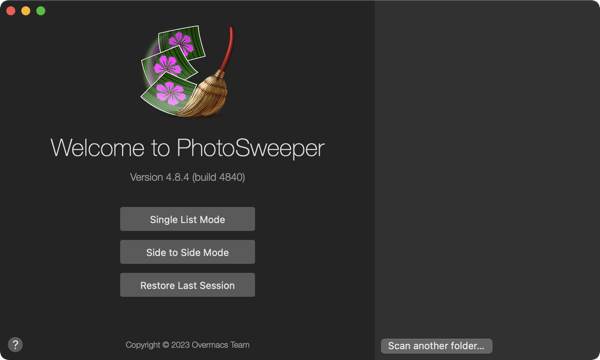
Click the Media Browser button in the lower left corner and add your Lightroom catalog file. If your photo library is large, it will take some time to read your catalog. A media browser window like the one pictured below will open.
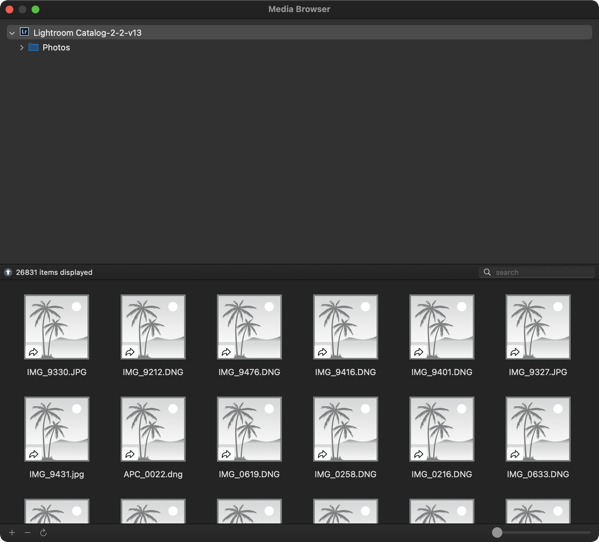
You can drag and drop folders or files into the main PhotoSweeper window. I recommend starting with the top-level folder that contains your photos. After you add the folder, click the Compare button.
There are three options: Duplicate Files, Similar Photos, and Series of Shots. I used all three in this order:
- Duplicate Files
- Series of Shots
- Similar Photos
Between each pass, I opened Lightroom and deleted the rejected photos so that the next pass would be operating on a smaller catalog.
Note: Keep Lightroom closed while using PhotoSweeper.
Duplicate Files
I checked for duplicate files first. Here are the settings I used:
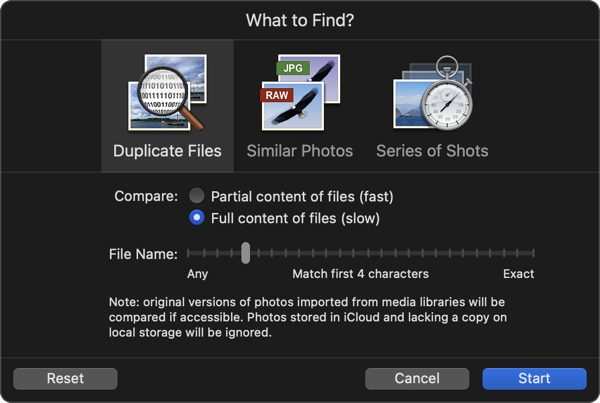
I chose “Full content of files” even though it’s slower because I wanted to be as certain as possible that it was finding duplicate files. I matched the first four characters of the file name because all of my photos generally have file names like “IMG_1234.JPG” or “DSCF1234.RAF.”
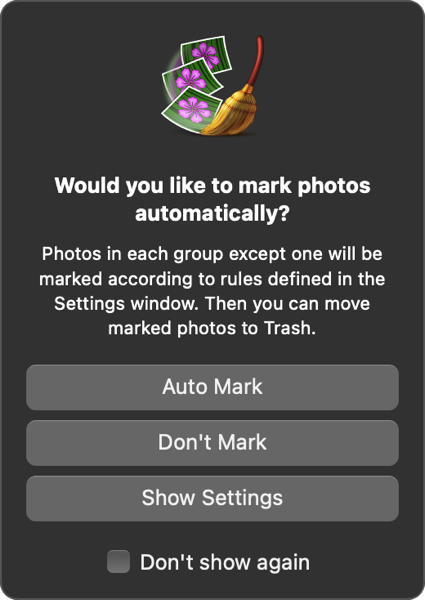
After you configure the settings, click Start. If PhotoSweeper finds any duplicates, it will ask if you want to auto-mark photos to be trashed. I recommend clicking Don’t Mark so that you can select them yourself. It’s more time-consuming, but sometimes photos get misidentified as duplicates, so I manually checked each one.
Go through each group and mark the photos you want to delete. Then click Trash Marked. Trashed photos are rejected in Lightroom. You can then close PhotoSweeper and open Lightroom to delete the rejected photos.
Series of Shots
This is useful if you take shots with exposure bracketing, burst mode, or any other technique that produces a set of very similar photos in a short period of time.
Here are the settings I used for Series of Shots:
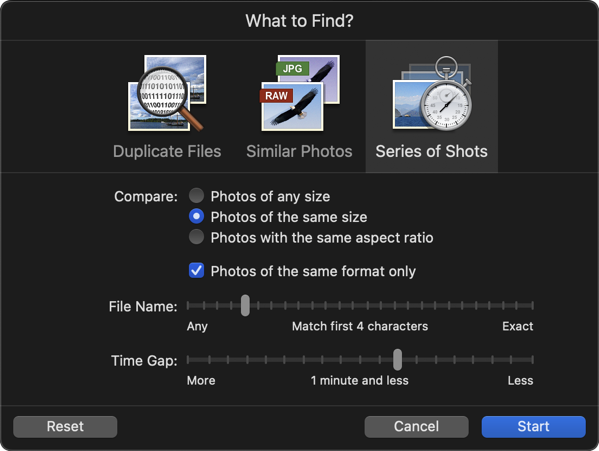
I chose these settings because photos taken with exposure bracketing or burst mode should be of the same size and format, and in my case, have the first four characters of the file name in common.
As with Duplicate Files, I recommend selecting the photos yourself instead of auto-marking.
Similar Photos
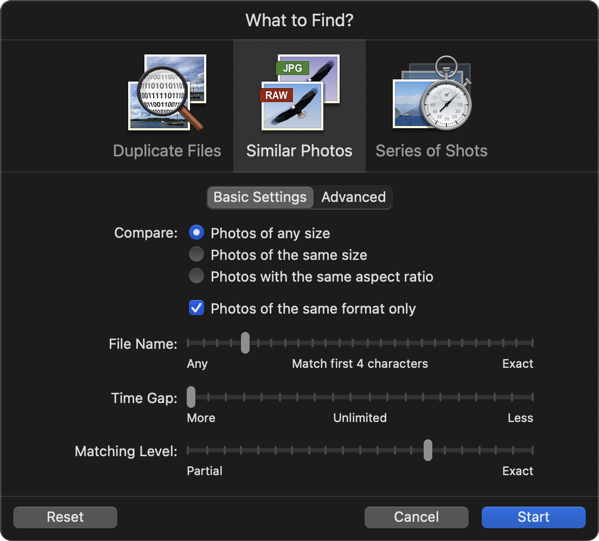
This mode can be used to find photos with the same subject but different composition, sizes or file formats. I was probably too conservative with my settings for this mode, but I was erring on the side of caution. This mode has basic and advanced settings.
Here are my basic settings:
And my advanced settings:
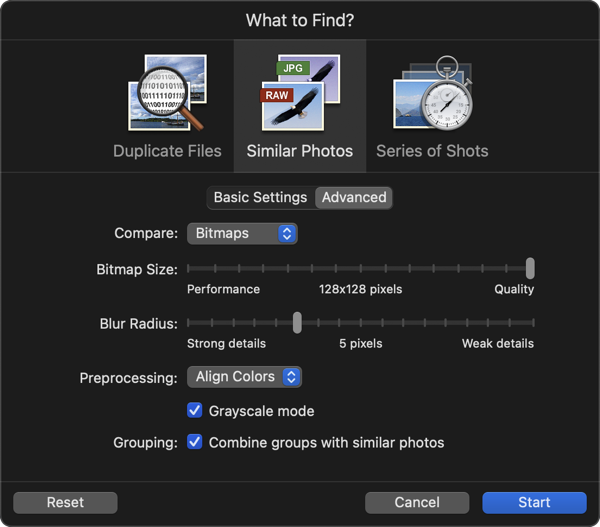
I chose “Photos of any size” since I was using this mode to look for photos with similar subjects. I selected “Photos of the same format only” because I often edit a RAW file and then export it as a JPEG, and I want to keep both of those. The others I arrived at through a bit of trial and error. You may want to experiment on a small batch of files, see how it works, and adjust as needed.
Once again, I don’t recommend using auto-mark.
6. Clean up Lightroom folders
In Lightroom, a folder can contain files (photos and videos) and other folders. In Photos, however, folders can only contain albums. Albums can only contain photos and videos.
When migrating from Lightroom to Photos, the lowest-level Lightroom folders that contain only photos and videos will become albums in Photos. All other Lightroom folders (those that contain other folders) will become folders in Photos. It’s therefore necessary to find any Lightroom folders that contain both folders and files, and then move those files into subfolders.
My script find-files-and-folders.py will find the offending folders and display a list on the screen so that you can perform any required cleanup.
-
Open the script in a text editor, find the line
photo_dir = '/Path/To/Lightroom/Photos', and change the path to the top-level folder where your photos are stored. -
Open Terminal and
cdto the directory where you saved the script. -
Type
python3 ./find-files-and-folders.pyand press Return. -
The script will display a list of folders that contain both files and subfolders.
Folders that contain files and folders: /Volumes/Media HD/LR/Test/Photos/Folder B /Volumes/Media HD/LR/Test/Photos/Folder B/Folder C -
If there are no folders that contain both files and folders, the script will display “None found.”
-
If any folders contain both files and folders, open Lightroom and move the files into subfolders.
7. Export photos from Lightroom
Now you’re ready to export your photos from Lightroom. Before proceeding, it’s a good idea to make another backup of your Lightroom catalog and files if you have enough available storage.
Since Lightroom stores edits and metadata in a database instead of in the original file, you need to export the photos from Lightroom and then import those exported files into the Photos app. Exporting will “flatten” the files, storing the metadata in the file (and depending on the export format, applying all edits in the process). As I wrote at the beginning of the post, you’ll lose some fidelity this way. You won’t be able to revert any edits because Photos won’t be aware of those edits.
I exported all RAW and DNG files as DNG files. I exported everything else (JPEG, videos, etc.) in its original format.
A warning about exporting to DNG: Metadata like GPS coordinates will be “flattened” into the exported DNG, and you’ll be able to see the metadata in Photos. Edits, however, will not be visible. If you have an edited RAW file and want to keep the edited version, you’ll need to export it as a TIFF or JPEG. (My typical Lightroom workflow was to export RAW files as JPEGs after editing, so I knew I already had my “keepers” as JPEGs.) Note that a TIFF or JPEG will still be a flattened file; you won’t be able to undo any edits after exporting from Lightroom.
It’s simple enough to export photos from Lightroom, but I wanted to maintain the same folder structure that I had in Lightroom. That way I could replicate the structure as folders and albums in Photos. After some searching, I found a “donationware” Lightroom plug-in called Folder Publisher. (Note: The URL is HTTP only. In order to access the site, you’ll need to temporarily disable any browser settings or extensions that force HTTPS.) Folder Publisher lets you set up a publish service in Lightroom that exports your photos to a location on your hard drive while maintaining the folder structure.
Install the Folder Publisher plug-in
-
On the Folder Publisher webpage, download the zip file under “Latest Download” at the top of the page and unzip it.
-
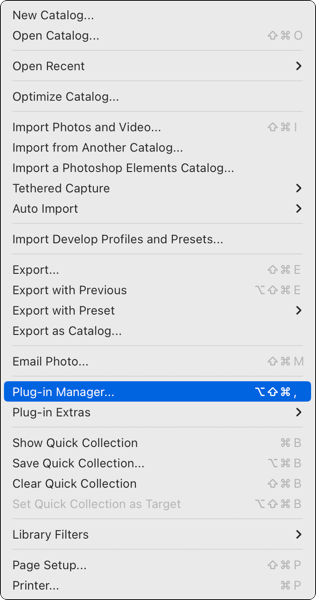
In Lightroom, click File > Plug-in Manager…
-
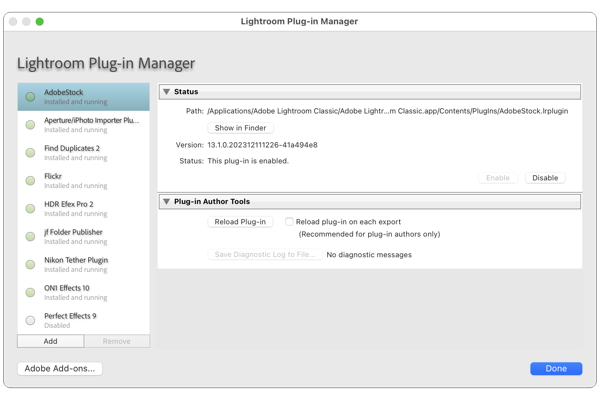
Click Add at the bottom of the Plug-in Manager window.
-
Select the file
folder-publisher-jfriedl.lrpluginfrom your hard drive and then click Add Plug-in. -
Click Done to close the Plug-in Manager window.
Set up Publish Services
I created two services because I was exporting some files as DNG and some files in their original format.
-
Under Publish Services in Lightroom’s left panel, click this button:

-
Enter your desired settings and click Save.
-
You’ll now see a new service in the Publish Services panel.

-
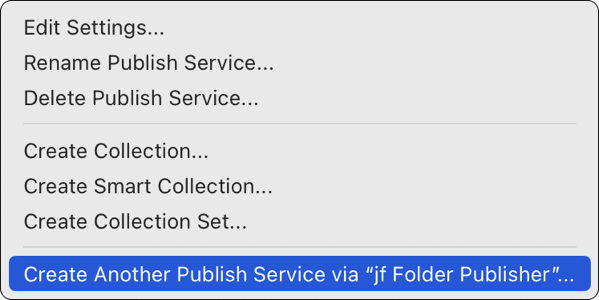
Right-click the jf Folder Publisher service you just created and select Create Another Publish Service via “jf Folder Publisher”…
-
Enter your desired settings and click Save.
Click the links below to see my settings for the services.
Set up Smart Collections
Under each service, set up a Smart Collection of files to export.
-
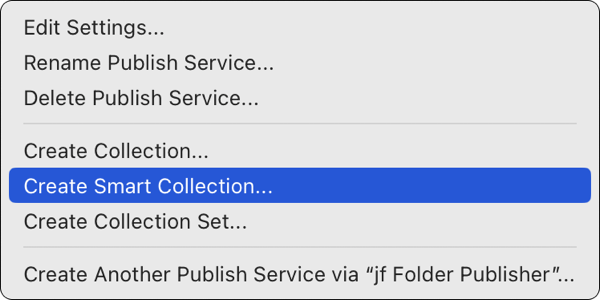
Right-click the jf Folder Publisher button of one of the services.
-
Select Create Smart Collection…
-
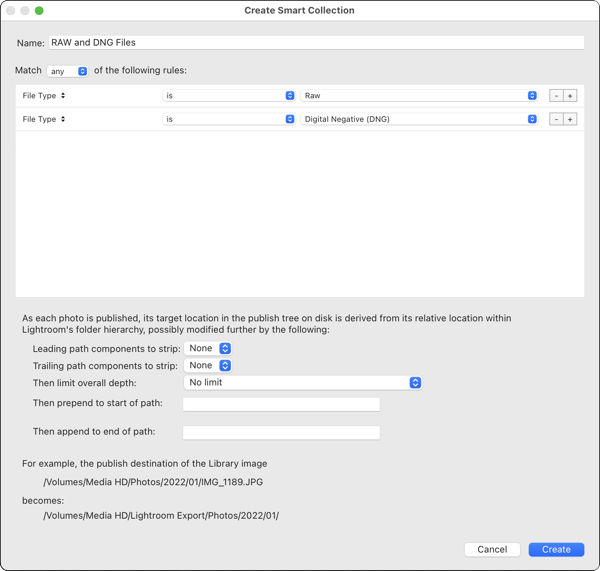
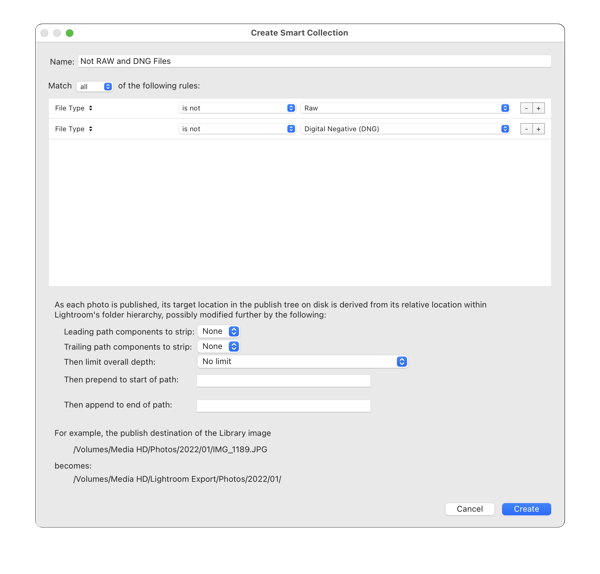
Enter your desired rules and click Create.
Here are my Smart Collection settings for RAW and DNG Files.
And for everything that’s not a RAW or DNG file.
Export photos
Everything is now set up for publishing (exporting). When you publish each Smart Collection, it will export the files to the specified location, and it will maintain the folder structure you had set up in Lightroom.
-
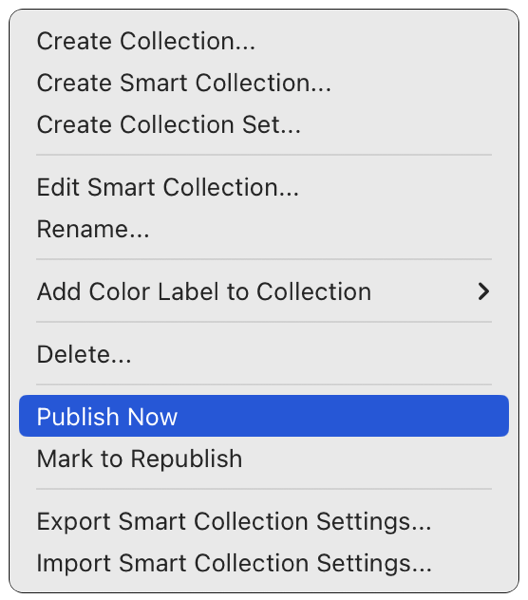
Right-click the Smart Collection under one of the Publish Services.
-
Click Publish Now.
-
Wait for publishing to complete. (It will take a while if you’re exporting thousands of files.)
-
Repeat with the other Folder Publisher service.
8. Clean up exported files
Run PhotoSweeper on the exported files
I made another pass with PhotoSweeper, this time with just the “similar photos” option. It works the same as described earlier in this post, except that when you open PhotoSweeper, click Add Folder instead of Media Browser, and then select the export folder that you configured in Folder Publisher.
Zero-byte files
One thing to watch out for, and something I saw quite a few instances of, is zero-byte files. Some of my files were exported from Lightroom as zero-byte files. Essentially, a file with the right filename but no content was created during the export. You can see these easily in Finder because they’ll show a size of “zero bytes.”

If you see any files like this, you’ll need to go back into Lightroom and export them again. I recommend exporting these files individually rather than rerunning the Publish Service. It’s more tedious, but ultimately it’ll be faster and less error prone than republishing the entire Smart Collection.
9. Create the Photos library, folders and albums
Create (or open) a Photos library
I started with a clean, empty Photos library. If you want to do the same, follow the steps below. If you already have a Photos library and don’t want to create a new one, just open Photos and proceed to Configure Photos to import files to the library.
-
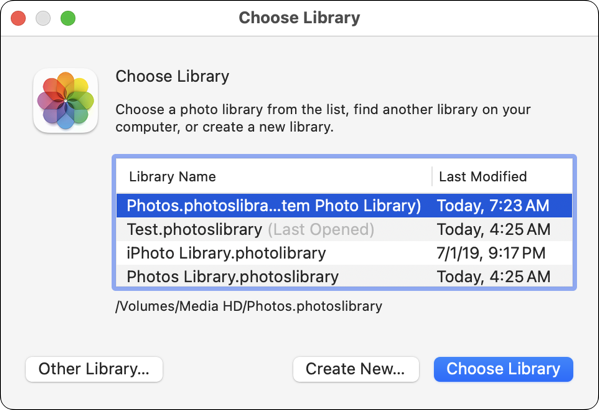
If the Photos app is in your dock, hold the ⌥ (option) key and click the application icon in the dock. Don’t release the ⌥ key until you see the window pictured below in step 3.
-
If Photos isn’t in your dock, open the Applications folder in Finder, then hold the ⌥ (option) key and double-click the application icon. Don’t release the ⌥ key until you see the window pictured below in step 3.
-
When the Choose Library window opens, click Create New…
-
Give it a name, choose a folder, and click OK.

Configure Photos to import files to the library
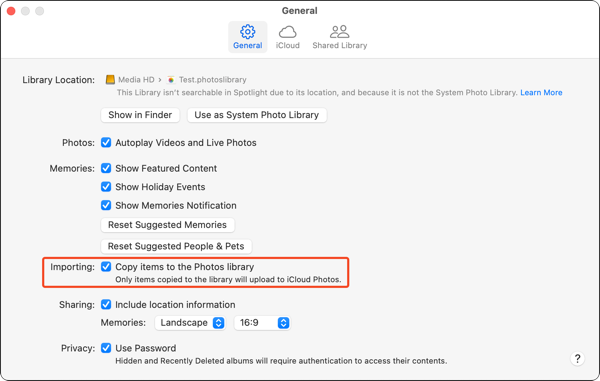
Photos can be stored either in a folder on your Mac or in the Photos library. If they’re stored in a folder on your Mac, the Photos library only contains a reference to the files. If they’re stored in the Photos library, the library (the .photoslibrary file) contains the actual media files. If you want to use iCloud Photos, photos must be stored in the Photos library.
-
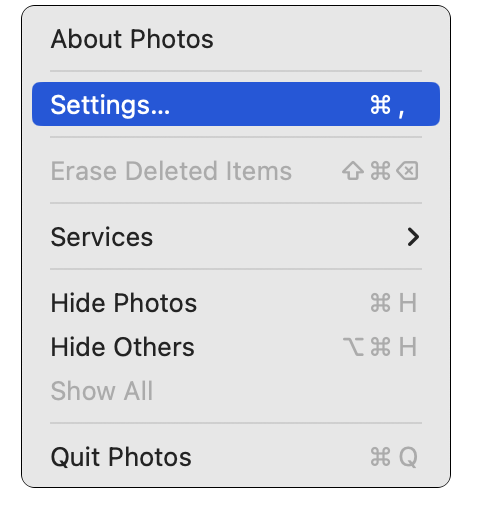
In the Photos app, click the Photos menu.
-
Click Settings…
-
Make sure General is selected at the top of the window and then check the box next to Copy items to the Photos library.
-
Close the Settings window.
Create albums and folders
There’s a simple way to import folders and files into the Photos app. You can drag a folder from Finder to My Albums in the Photos sidebar. Photos will create folders and albums to mirror the structure of the folder you dragged into the app. If a folder contains other folders, it will import as a folder. If a folder contains media files, it will import as an album.
I didn’t do it this way for two reasons:
-
Photos creates extra folders. As you can see in the video below, dragging a folder from Finder into Photos will automatically create folders and albums. However, notice what it does for the lowest-level folder (the one that contains the photo). It creates a folder, and then inside of that folder it creates an album with the same name.
With this folder structure in Finder…
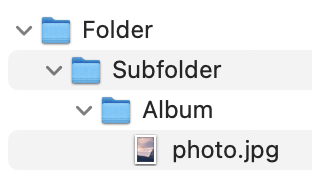
… I expected “Folder” and “Subfolder” to become folders in Photos, and I expected “Album” to become an album.
Instead, “Folder” and “Subfolder” became folders, and “Album” became a folder and an album.
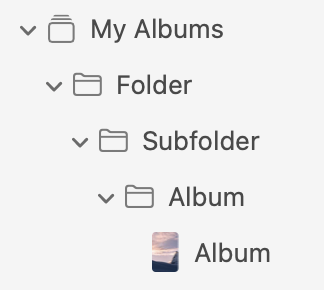
-
Importing media files is prone to errors. Photos will sometimes fail to import files with an error like “unsupported file type,” “file contains invalid data” or “unknown error.” Often, if you simply restart Photos and try the import again, it will work. Since these errors are unpredictable and often ambiguous, it’s a lot easier to deal with them if you’re importing photos in smaller batches rather than importing in a folder with many levels of nested subfolders.
To work around these issues, I wrote a Python script to create the folders and albums. My script create-folders-and-albums.py reads a folder of nested subfolders and media files. For any folder than contains subfolders, it creates a folder in Photos. For any folder that contains only media files, it creates an album in Photos. The folder-album tree in Photos will exactly mirror the folder tree in Finder.
The script displays its output on the screen and creates a timestamped log file in the same directory as the script.
To run the script:
-
Open the script in a text editor, find the line
photos_path = '/Path/To/Lightroom/Export', and change the path to the top-level folder of media files you want to import into Photos. Note that the script will start reading folders underphotos_path. It won’t create a Photos folder forphotos_path.For example, in the screenshot below,
photos_pathwould be the “Exported Photos” folder. “Folder” would be the first folder created in Photos. There would be no “Exported Photos” folder in the Photos app.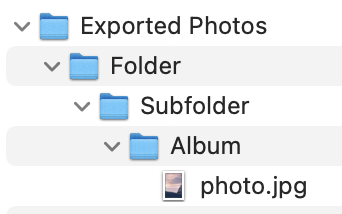
-
Find the line
photo_library_path = '/Path/To/Photos.photoslibrary'and change the path to the full path of your Photos library. (It’s a file with the extensionphotoslibrary.) -
Open Terminal and
cdto the directory where you saved the script. -
Type
python3 ./create-folders-and-albums.pyand press Return.
The script will display its output in Terminal, and it will also write the same output to a log file. If you have a lot of folders, the log file will be easier to read and make sure everything was created correctly.
The script reports each folder and album it creates.
2024-01-04 08:03:03,049 - INFO: Library "/Volumes/Media HD/Test.photoslibrary" opened
2024-01-04 08:03:03,049 - INFO: Starting in directory "/Volumes/Media HD/LR/Test/Exported Photos"
2024-01-04 08:03:03,050 - INFO: Folder "Folder" contains subfolders. Creating folder...
2024-01-04 08:03:03,318 - INFO: Created folder "Folder" with ID "OB2DEDED-2588-4A7B-9E16-EF03D23B75C0"
2024-01-04 08:03:03,318 - INFO: Folder "Subfolder" contains subfolders. Creating folder...
2024-01-04 08:03:03,549 - INFO: Created folder "Subfolder" with ID "F9DD32C5-716B-4AFC-B102-8455FB4BFFDA"
2024-01-04 08:03:03,550 - INFO: Folder "Album" contains media files. Creating album...
2024-01-04 08:03:03,669 - INFO: Created album "Album" with ID "AFDB34D5-693C-4D14-9C0E-060A6221F1F6"
2024-01-04 08:03:03,669 - INFO: Folders created: 2. Expected 2.
2024-01-04 08:03:03,669 - INFO: Albums created: 1. Expected 1.
2024-01-04 08:03:03,669 - INFO: Script finished.
And in Photos, the folder-album tree looks like the folder tree in Finder.
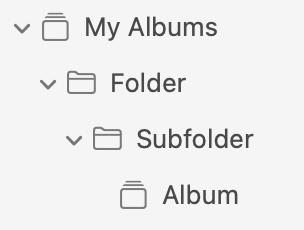
10. Import photos and videos
Now that the folders and albums have been created, the next step is to import your photos and videos. This was the really tedious part because I just dragged the files from Finder into the right albums. I did this with about 26,000 files, and it took several weekends to finish.
My original plan was to script the import much like I scripted folder and album creation. It didn’t work, however, because of the import errors. When a file can’t be imported, Photos displays a dialog with an often unhelpful error message and a list of the files that couldn’t be imported. I couldn’t come up with a way to catch the import errors in a script, so every time a file couldn’t be imported, the script would crash. After several attempts — and deleting the Photos library and starting over a few times — I gave up on the script and decided to just drag the files in manually. It was time-consuming, but it made it much easier to deal with import errors.
How to handle import errors
I ran into a lot of errors while importing my files and learned a few lessons about how to fix those errors. Here are my suggestions, in the order that you should try them, if you encounter an import error.
- Make sure the file isn’t a zero-byte file. If it is, export it from Lightroom again and retry the import with the new file.
- Quit Photos, open it again, and retry the import. This “fixed” the majority of the import errors that I encountered.
- Make sure the file is of a supported type. I couldn’t find a definitive list of file types supported by Photos, but I had trouble with MPG files specifically. I had some old VHS rips that were MPG files. I had to convert them to MP4 using Permute, which I have as part of my Setapp subscription. (Handbrake is a good free option that can convert video files to other formats.)
11. Verify the import
This step is optional, but I wanted an extra level of comfort that all of the files had been imported into the correct albums. The only practical way to do this is with a script, so I wrote verify-import.py. The script compares the media files in your Photos library to the files in the folder tree where your exported photos are stored.
The script displays any missing files on the screen.
2024-01-05 08:25:54,467 - INFO: Library "/Volumes/Media HD/Test.photoslibrary" opened
2024-01-05 08:25:54,738 - ERROR: COUNT MISMATCH: Directory "/Volumes/Media HD/LR/Test/Exported Photos/2023/Holidays/Thanksgiving" contains 5 files but album "2023/Holidays/Thanksgiving" contains 4 files.
2024-01-05 08:25:54,738 - ERROR: photo5.jpg not found in album "2023/Holidays/Thanksgiving"
2024-01-05 08:25:54,738 - ERROR: Album "2023/Holidays/Thanksgiving" is missing 1 items.
2024-01-05 08:25:54,738 - INFO: Checked 1 of 1 albums.
2024-01-05 08:25:54,738 - INFO: 1 albums are missing items.
2024-01-05 08:25:54,738 - INFO: See /Users/geoff/temp/missing-files.csv for list of missing items.
2024-01-05 08:25:54,739 - INFO: Script finished.
It also creates a timestamped log file with more detailed output (the DEBUG lines) in the same directory as the script.
2024-01-05 08:25:54,467 - INFO: Library "/Volumes/Media HD/Test.photoslibrary" opened
2024-01-05 08:25:54,695 - DEBUG: Album: 2023/Holidays/Thanksgiving
2024-01-05 08:25:54,695 - DEBUG: Directory: /Volumes/Media HD/LR/Test/Exported Photos/2023/Holidays/Thanksgiving
2024-01-05 08:25:54,738 - ERROR: COUNT MISMATCH: Directory "/Volumes/Media HD/LR/Test/Exported Photos/2023/Holidays/Thanksgiving" contains 5 files but album "2023/Holidays/Thanksgiving" contains 4 files.
2024-01-05 08:25:54,738 - ERROR: photo5.jpg not found in album "2023/Holidays/Thanksgiving"
2024-01-05 08:25:54,738 - ERROR: Album "2023/Holidays/Thanksgiving" is missing 1 items.
2024-01-05 08:25:54,738 - INFO: Checked 1 of 1 albums.
2024-01-05 08:25:54,738 - INFO: 1 albums are missing items.
2024-01-05 08:25:54,738 - INFO: See /Users/geoff/temp/missing-files.csv for list of missing items.
2024-01-05 08:25:54,739 - DEBUG: ALBUMS MISSING ITEMS:
2024-01-05 08:25:54,739 - DEBUG: 2023/Holidays/Thanksgiving
2024-01-05 08:25:54,739 - INFO: Script finished.
If any media files are missing from the Photos app, it creates a CSV file called missing-files.csv in the same directory as the script. The CSV columns are
- Album: The album where the script expected to find the file.
- Directory: The directory on your Mac where it found the file.
- File: The name of the file that’s missing from Photos.

Refer to the script output and manually import any missing files.
12. Set the System Photo Library and enable iCloud Photos
iCloud Photos can only be used with the System Photo Library, so if you want to use iCloud Photos, make this library the system library.
-
Click the Photos menu > Settings…
-
Make sure General is selected at the top and then click the Use as System Photo Library button. (If the button is grayed out, this library is already your System Photo Library.)
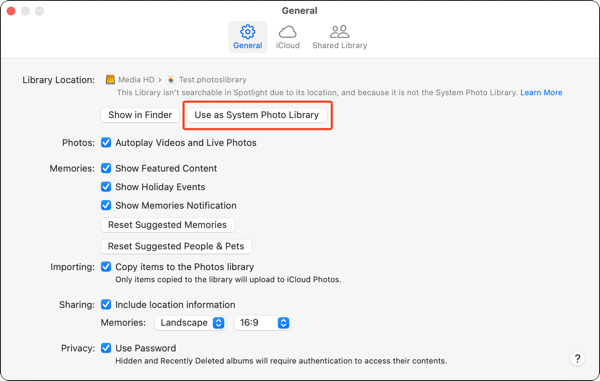
-
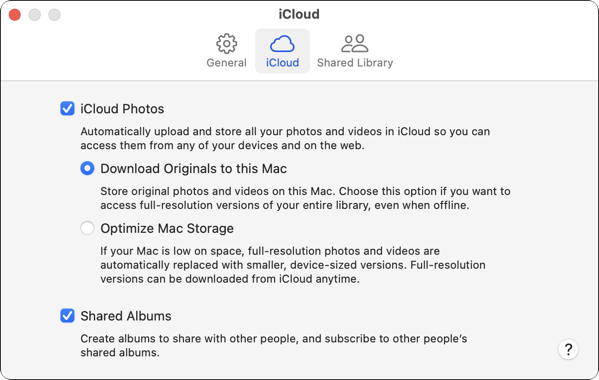
Click iCloud at the top of the Settings window.
-
Check the iCloud Photos box.
-
Select Download Originals to this Mac to always keep the full-resolution files on your Mac. (I recommend this option.)
-
Select Optimize Mac Storage to store full-resolution files in iCloud and lower quality files on your Mac. (I don’t recommend this unless your Mac is low on storage.)
-
Check the Shared Albums box to use shared albums on your Mac.
-
Close the Settings window.
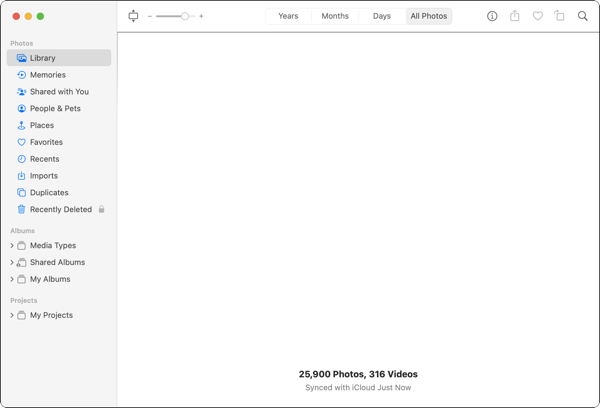
Your photos will now start uploading to iCloud and will eventually be available on your other Apple devices. Depending on the number of photos you have, this could take hours or days. You can see the sync status by clicking Library in the sidebar, then All Photos at the top. Scroll to the bottom of the window, and you’ll see the iCloud sync status.
13. Archive the exported photos
Once you’re comfortable that everything is working correctly, you can compress the exported photos to save space. You could delete them altogether, but I would rather have those files as a backup just in case I discover an issue in the future.
14. Archive your Lightroom catalog and cancel your Adobe subscription
Make a final backup of your Lightroom catalog and then backup your files by repeating the backup process from part 4. It’s a good idea to wait as long as possible, depending on how long is left on your Adobe subscription, before doing this just in case you find a problem with Photos and need to export a photo from Lightroom again.
Finally, cancel your Adobe subscription.